
In the ever-evolving realm of cloud computing, creating a rock-solid infrastructure is like laying the foundation for a skyscraper. You want it to be robust, scalable, and capable of withstanding any unforeseen storms that might come your way. That’s where Terraform, the open-source infrastructure as code (IaC) tool, steps in as your trusty architect and construction crew.
In this blog post, we’re going to embark on an exciting journey to design a high-availability (HA) AWS cloud architecture using Terraform. Picture this: multiple availability zones, two public and two private subnets, and an EC2 instance residing in each subnet. The best part? We’ll ensure that even those instances tucked away in the private nooks have internet access, all while maintaining the utmost security.
So, grab your hardhat and put on your architect’s thinking cap because we’re about to lay the groundwork for a cloud infrastructure that’s as resilient as it is powerful. It’s time to unleash the full potential of Terraform and AWS to make your cloud dreams a reality. Ready to dive in? Let’s get started
All the flies are in this Github repository.
Preview of the Architecture we’ll build
The architecture we’ll build is like this:
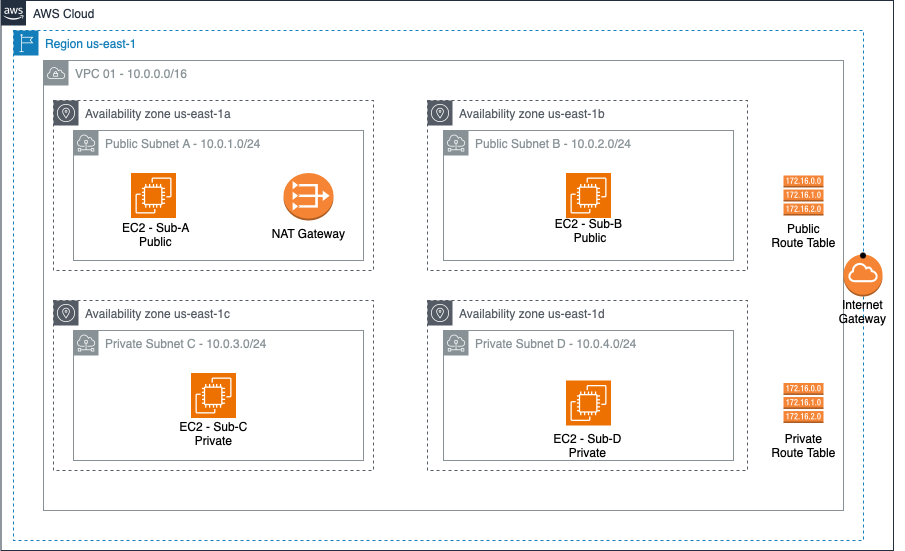
We will use the region us-east-1 (North Virginia), and four of its availability zones: us-east-1a, us-east-1b, us-east-1c and us-east-1d.
The VPC (Virtual Private Network) will have the IP 10.0.0.0/16, which means we can create IPs like 10.0.*.*.
It will have four subnets, one in each availability zone. We will call them Sub A, Sub B, Sub C and Sub D.
The Sub A and Sub B will be public, so they will have access to the internet and the internet can access them.
In the other hand, Sub C and Sub D will be private, which means that there will be NO traffic from the internet into the subnets. In order to allow traffic from the private subnets to the internet, we will use a NAT Gateway.
We will create two Route Tables, one for the public subnets and another to the private subnets. And also an Internet Gateway, to allow traffic from the VPC to the internet.
Each subnet will have an EC2 Instance, so we can access them and test the internet connectivity.
Enough talking. Let’s code!
Defining the Provider
First of all, let’s create a file called provider.tf, in which we’ll define the AWS provider, like so:
terraform {
  required_providers {
    aws = {
      source  = "hashicorp/aws"
      version = "5.23.1"
    }
  }
}

provider "aws" {
  # Configuration options
  profile = "rberaldoaws-admin"
  region  = "us-east-1"
}
We are using the version 5.23.1, which is the latest as the time I write this article.
For the credentials, I’m using a profile named rberaldoaws-admin, which is defined in my ~/.aws/credentials file. You may change to your profile name.
Defining the variables
Let’s create a variables.tf file, in which we’ll define some variables to be used in the resource definitions:
variable "vpc_cidr" {
  type        = string
  description = "The IP range to use for the VPC"
  default     = "10.0.0.0/16"
}

variable "ec2_ami_id" {
  default     = "ami-008d819eefb4b5ee4" # Ubuntu 22.04
  description = "AMI Image ID"
}
It’s self-explaining! ?
Not let’s create the resources themselves!
Creating the Network
Let’s create a vpc.tf file, with this content:
# Creates the VPC-01
resource "aws_vpc" "vpc-01" {
  cidr_block = var.vpc_cidr

  tags = {
    Name = "VPC-01"
  }
}

# Created a public subnet named Sub-A
resource "aws_subnet" "sub-a-public" {
  vpc_id            = aws_vpc.vpc-01.id
  availability_zone = "us-east-1a"
  cidr_block        = "10.0.1.0/24"

  tags = {
    Name = "Sub-A-Public"
    Role = "public"
  }
}

# Created a public subnet named Sub-B
resource "aws_subnet" "sub-b-public" {
  vpc_id            = aws_vpc.vpc-01.id
  availability_zone = "us-east-1b"
  cidr_block        = "10.0.2.0/24"

  tags = {
    Name = "Sub-B-Public"
    Role = "public"
  }
}


# Creates a private subnet names Sub-C
resource "aws_subnet" "sub-c-private" {
  vpc_id            = aws_vpc.vpc-01.id
  availability_zone = "us-east-1c"
  cidr_block        = "10.0.3.0/24"

  tags = {
    Name = "Sub-C-Private"
    Role = "private"
  }
}

# Creates a private subnet names Sub-D
resource "aws_subnet" "sub-d-private" {
  vpc_id            = aws_vpc.vpc-01.id
  availability_zone = "us-east-1d"
  cidr_block        = "10.0.4.0/24"

  tags = {
    Name = "Sub-D-Private"
    Role = "private"
  }
}

resource "aws_internet_gateway" "internet-gateway" {
  vpc_id = aws_vpc.vpc-01.id

  tags = {
    Name = "VPC-IGW"
  }
}

resource "aws_eip" "eip-sub-a" {
  domain   = "vpc"

  tags = {
    Name = "Sub-A Elastic IP"
  }
}


resource "aws_nat_gateway" "public-nat-gateway" {
  allocation_id = aws_eip.eip-sub-a.id
  subnet_id     = aws_subnet.sub-a-public.id

  tags = {
    Name = "Sub-A NAT Gateway"
  }

  # To ensure proper ordering, it is recommended to add an explicit dependency
  # on the Internet Gateway for the VPC.
  depends_on = [aws_internet_gateway.internet-gateway]
}

resource "aws_route_table" "public-route-table" {
  vpc_id = aws_vpc.vpc-01.id

  route {
    cidr_block = "10.0.0.0/16"
    gateway_id = "local"
  }

  route {
    cidr_block = "0.0.0.0/0"
    gateway_id = aws_internet_gateway.internet-gateway.id
  }

  tags = {
    Name = "VPC-01-RT-Public"
  }
}

resource "aws_route_table" "private-route-table" {
  vpc_id = aws_vpc.vpc-01.id

  route {
    cidr_block = "10.0.0.0/16"
    gateway_id = "local"
  }

  route {
    cidr_block = "0.0.0.0/0"
    gateway_id = aws_nat_gateway.public-nat-gateway.id
  }

  tags = {
    Name = "VPC-01-RT-Private"
  }
}

resource "aws_route_table_association" "associate-sub-a-public-rt" {
  subnet_id      = aws_subnet.sub-a-public.id
  route_table_id = aws_route_table.public-route-table.id
}

resource "aws_route_table_association" "associate-sub-b-public-rt" {
  subnet_id      = aws_subnet.sub-b-public.id
  route_table_id = aws_route_table.public-route-table.id
}

resource "aws_route_table_association" "associate-sub-c-private-rt" {
  subnet_id      = aws_subnet.sub-c-private.id
  route_table_id = aws_route_table.private-route-table.id
}

resource "aws_route_table_association" "associate-sub-d-private-rt" {
  subnet_id      = aws_subnet.sub-d-private.id
  route_table_id = aws_route_table.private-route-table.id
}
Here we create these resources:
- VPC 01: Our VPC, using the CIDR 10.0.0.0/16
- Sub-A-Public: A public subnet, using the CIDR 10.0.1.0/24
- Sub-B-Public: A public subnet, using the CIDR 10.0.2.0/24
- Sub-C-Private: A private subnet, using the CIDR 10.0.3.0/24
- Sub-D-Private: A private subnet, using the CIDR 10.0.4.0/24
- VPC-IGW: The VPC Internet Gateway
- Sub-A Elastic IP: An Elastic IP, to be used by the NAT Gateway
- Sub-A NAT Gateway: A NAT Gateway, to be used by the private subnets, in order to allow internet access from the private EC2 Instances
- VPC-01-RT-Public: The public Route Table, which maps 10.0.0.0/16 to the local network and 0.0.0.0/0 to the Internet Gateway
- VPC-01-RT-Private: The private Route Table, which maps 10.0.0.0/16 to the local network and 0.0.0.0/0 to the NAT Gatewah
- The route tables associations to the subnets
Understanding the NAT Gateay
The NAT Gateway is used as an one-way gate to the Internet. The goal is to allow traffic from the VPC to the Internet, but block the opposite traffic. That means that is impossible to reach a NAT Gateway from outside the VPC.
That’s the main difference between Internet Gateway and NAT Gateway. The Internet Gateway is two-way traffic, so it allows traffic from the internet into the VPC and also from internal to the Internet. In the other hand, NAT Gateway is one-way traffic only, allowing just traffic from the VPC to the internet.
We may need a NAT Gateway to enable the private EC2 instances to access the internet. They might need internet access for some tasks, such as Operating System updates.
Creating the EC2 Instances
Before creating the EC2 instances, we need to create a SSH key pair. Run this command:
ssh-keygen -t rsa -b 4096 -f ~/.ssh/aws-infra -N ""
It will create a private key at ~/.ssh/aws-infra and a public key at ~/.ssh/aws-infra.pub.
Create a file ec2.tf like so:
resource "aws_security_group" "sg-allow-ssh" {
  name        = "Allow-SSH"
  description = "Allow SSH traffic"
  vpc_id      = aws_vpc.vpc-01.id

  ingress {
    description = "SSH Traffic"
    from_port   = 22
    to_port     = 22
    protocol    = "tcp"
    cidr_blocks = ["0.0.0.0/0"]
  }

  egress {
    from_port        = 0
    to_port          = 0
    protocol         = "-1"
    cidr_blocks      = ["0.0.0.0/0"]
    ipv6_cidr_blocks = ["::/0"]
  }


  tags = {
    Name = "sg-Allow-SSH"
  }
}

# Be sure to run this comamnd on terminal, in order to create the SSH keys locally
#
# ssh-keygen -t rsa -b 4096 -f ~/.ssh/aws-infra -N ""

resource "aws_key_pair" "ec2-key-pair" {
  key_name   = "ec2-key"
  public_key = file("~/.ssh/aws-infra.pub")
}

resource "aws_instance" "ec2-sub-a-public" {
  ami                         = var.ec2_ami_id
  instance_type               = "t2.micro"
  subnet_id                   = aws_subnet.sub-a-public.id
  vpc_security_group_ids      = [aws_security_group.sg-allow-ssh.id]
  associate_public_ip_address = true
  key_name                    = aws_key_pair.ec2-key-pair.key_name

  tags = {
    Name = "EC2 Sub-A Public"
  }
}

output "ec2-sub-a-public-ip" {
  value = "EC2 Sub-A Public IP: ${aws_instance.ec2-sub-a-public.public_ip}"
}

output "ec2-sub-a-private-ip" {
  value = "EC2 Sub-A Private IP: ${aws_instance.ec2-sub-a-public.private_ip}"
}


resource "aws_instance" "ec2-sub-b-public" {
  ami                         = var.ec2_ami_id
  instance_type               = "t2.micro"
  subnet_id                   = aws_subnet.sub-b-public.id
  vpc_security_group_ids      = [aws_security_group.sg-allow-ssh.id]
  associate_public_ip_address = true
  key_name                    = aws_key_pair.ec2-key-pair.key_name

  tags = {
    Name = "EC2 Sub-B Public"
  }
}

output "ec2-sub-b-public-ip" {
  value = "EC2 Sub-B Public IP: ${aws_instance.ec2-sub-b-public.public_ip}"
}

output "ec2-sub-b-private-ip" {
  value = "EC2 Sub-B Private IP: ${aws_instance.ec2-sub-b-public.private_ip}"
}


resource "aws_instance" "ec2-sub-c-private" {
  ami                         = var.ec2_ami_id
  instance_type               = "t2.micro"
  subnet_id                   = aws_subnet.sub-c-private.id
  vpc_security_group_ids      = [aws_security_group.sg-allow-ssh.id]
  associate_public_ip_address = false
  key_name                    = data.aws_key_pair.internal-access-key-pair.key_name

  tags = {
    Name = "EC2 Sub-C Private"
  }
}

output "ec2-sub-c-private-ip" {
  value = "EC2 Sub-C Private IP: ${aws_instance.ec2-sub-c-private.private_ip}"
}


resource "aws_instance" "ec2-sub-d-private" {
  ami                         = var.ec2_ami_id
  instance_type               = "t2.micro"
  subnet_id                   = aws_subnet.sub-d-private.id
  vpc_security_group_ids      = [aws_security_group.sg-allow-ssh.id]
  associate_public_ip_address = false
  key_name                    = data.aws_key_pair.internal-access-key-pair.key_name

  tags = {
    Name = "EC2 Sub-D Private"
  }
}

output "ec2-sub-d-private-ip" {
  value = "EC2 Sub-D Private IP: ${aws_instance.ec2-sub-d-private.private_ip}"
}
The code creates these resources:
- sg-Allow-SSH: The security group that will be used in the EC2 instances, allowing SSH access from anywhere (0.0.0.0/0)
- ec2-key: the key pair, using the key we created some minutes ago, using the
ssh-keygencommand - The 4 EC2 instances, one in each subnet, also attaching the security group we’ve just created
- Each EC2 resource has two
outputs, in order to show the private IPs and public IPs, when applicable
Creating the resources in AWS
Now that we have all the file, let’s create the resources using the terraform command.
First, you may initialize the project:
terraform init
That command will download the aws provider.
After that, run:
terraform plan
The plan command will connect to your AWS account and compare the state of the cloud with your resources defined in the files.
You’ll see the list of resources that will be created. In the end of the output, you’ll see a summary, like this:
Plan: 20 to add, 0 to change, 0 to destroy.

Changes to Outputs:
  + ec2-sub-a-private-ip = (known after apply)
  + ec2-sub-a-public-ip  = (known after apply)
  + ec2-sub-b-private-ip = (known after apply)
  + ec2-sub-b-public-ip  = (known after apply)
  + ec2-sub-c-private-ip = (known after apply)
  + ec2-sub-d-private-ip = (known after apply)
That means that there are 20 resources to be added, 0 to change and 0 to remove.
To apply, run:
terraform applyIt will check the differences, show them to you and ask you to confirm. Type yes and press ENTER.
It will take some time. The list of the created resources will be shown in your screen.
The end of the output will look like this:
Apply complete! Resources: 20 added, 0 changed, 0 destroyed.

Outputs:

ec2-sub-a-private-ip = "EC2 Sub-A Private IP: 10.0.1.245"
ec2-sub-a-public-ip = "EC2 Sub-A Public IP: 3.83.83.94"
ec2-sub-b-private-ip = "EC2 Sub-B Private IP: 10.0.2.191"
ec2-sub-b-public-ip = "EC2 Sub-B Public IP: 34.201.63.165"
ec2-sub-c-private-ip = "EC2 Sub-C Private IP: 10.0.3.194"
ec2-sub-d-private-ip = "EC2 Sub-D Private IP: 10.0.4.97"
The IPs may be different for you.
Great Our architecture is online!
Simple!
Testing the connection to the EC2 instances
Now let’s teste the SSH connection the the EC2 instances.
You can use the ssh command, with the key we created earlier. Remember to change the IP addresses:
ssh -i ~/.ssh/aws-infra [email protected]You will be able to access the EC2 instances A and B. But C and D are private. So how do we access them?
We’ll use a bation host, or a jump host.
The bastion host
A bastion host is just a computer used as an intermediate to another one.
In our case, we can use EC2 A or B as a bastion host to access C or D.
That means we need to access A or B via SSH and them access C or D using SSH again.
Note that you’ll need to copy the aws-infra key into your bastion host, once it’s necessary to authenticate the access to C and D instances.
Destroying the Architecture
It’s simples to build the architecture, as it’s also simple to destroy it, so you won’t be billed for the resources.
To do so, run this command:
terraform destroyIt will show the resources to be removed. Type yes and press ENTER.
The end of the output will be like this:
Destroy complete! Resources: 20 destroyed.Nice! The 20 resources we created are now destroyed!
Conclusion
As we wrap up our journey through the creation of a high-availability AWS cloud architecture with Terraform, we’ve transformed ourselves into cloud architects with the power to shape the digital skyline.
The infrastructure we’ve designed is not just a testament to the magic of Terraform but also a testament to your vision and dedication to building a resilient, scalable, and secure cloud ecosystem.
In this endeavor, we’ve ventured into multiple availability zones, carefully constructed public and private subnets, and empowered our EC2 instances with internet access while safeguarding them against prying eyes.
It’s a testament to the flexibility and power of Terraform, where you’re not just coding; you’re crafting an architectural masterpiece.
Remember that this is just the beginning. The world of cloud computing is dynamic and ever-evolving. AWS and Terraform are your trusted allies, ready to adapt and grow with your needs.
Whether you’re hosting a simple web application, managing data lakes, or orchestrating complex microservices, your newfound expertise in AWS architecture will be your guiding star.
So, as you embark on your cloud journey, keep experimenting, keep innovating, and keep pushing the boundaries of what’s possible. The digital sky is the limit, and with Terraform as your architect’s blueprint, there’s no structure too grand, no challenge too complex.
Let your cloud dreams soar, and may your AWS architecture always stand tall and unyielding against the winds of change.

 I'm Roberto Beraldo (or just Beraldo), a passionate PHP Software Developer on a journey to evolve into a versatile DevOps and Cloud Engineer. Bachelor's Degree in Computer Science, with a strong foundation in web development and intermediate DevOps and Cloud Computing knowledge, I am dedicated to bridging the gap between software development and infrastructure management.
[…] take the architecture we created in this article as an […]